The pistol round in a competitive game is very important: winning it will not only raise the moral component of the team but also will give you an economic advantage over the enemy for the next couple of rounds.
On the Mirage, most of the sites’ approaches are shot from afar (ramp to CT-spawn, the palace from jungle, top mid from window, etc.), so using a simple execute/push the advantage will clearly be on the CT side. Today we are going to show you the strategy that will allow your team to deceive the enemy and execute B-site using a numerical advantage.
Description
The idea of tactic is to make a hard A-site fake and subsequent massive push of B-site. Implies that fake execute of A-site will force players to move from their default positions, which will give terrorists an advantage over the defence and will allow you to capture B-site with minimal losses.
What to buy?
- Player #1: 1 smoke grenade ($300) + 1 flashbang ($200);
- Player #2, A-lurker: 1 smoke grenade ($300) + 1-2 flashbangs ($200-400).
Player #1 might add P250 ($300) at the will.
T early positions
On the early timings, Ts take initial positions: player #2 lurks A-site and prepares to cover A-site with his nades, also he may try to show some presence around ramp.
All the other players go to B-apps and controlling a possible early underpass and B-aggression. Players #3 and #4 control B-apps, #5 - underpass.
Player #1 takes the position visualized on the tactical board:
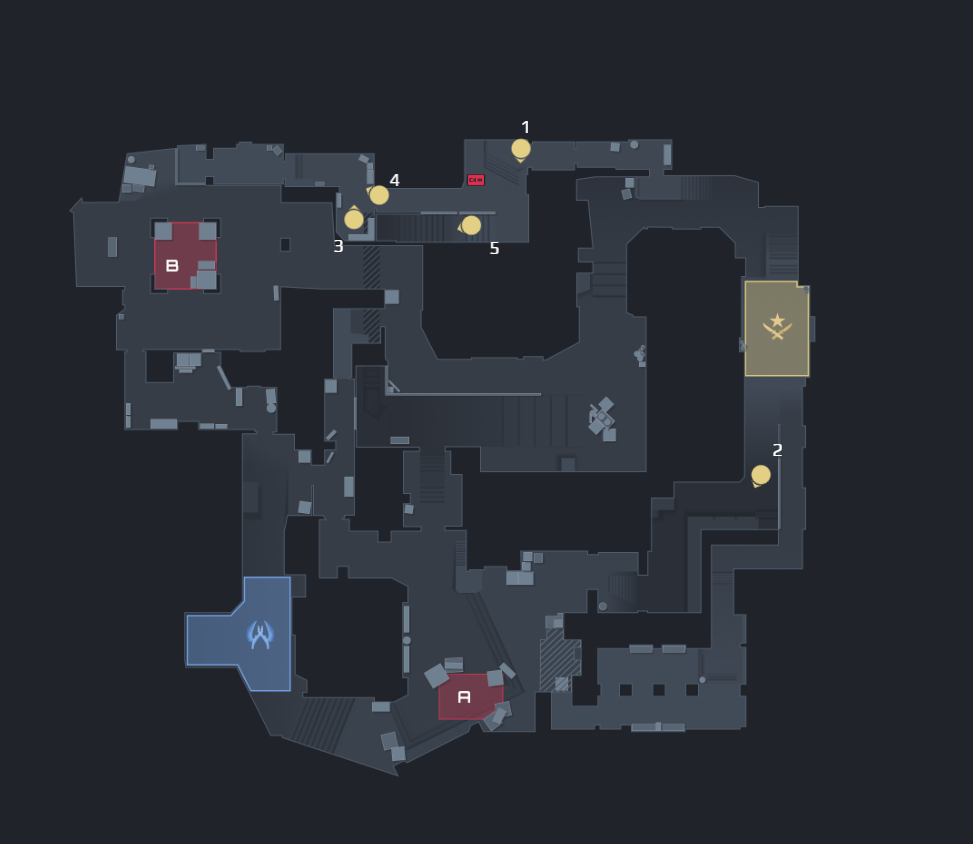 Ts initial positions
Enemies’ positions
By default, CTs usually play the following way: 2A-1mid-2B.
Since we are not really interested in the A-site and middle, let’s take a closer look at CTs positions on B-site. In most of the rounds, one player holds a car and checks B-apps, and the second one stays in the kitchen or on the short to prevent mid to B split.
 СTs default positioning
Our goal is to make one player rotate from B to A with a hard A-site fake.
Step by step
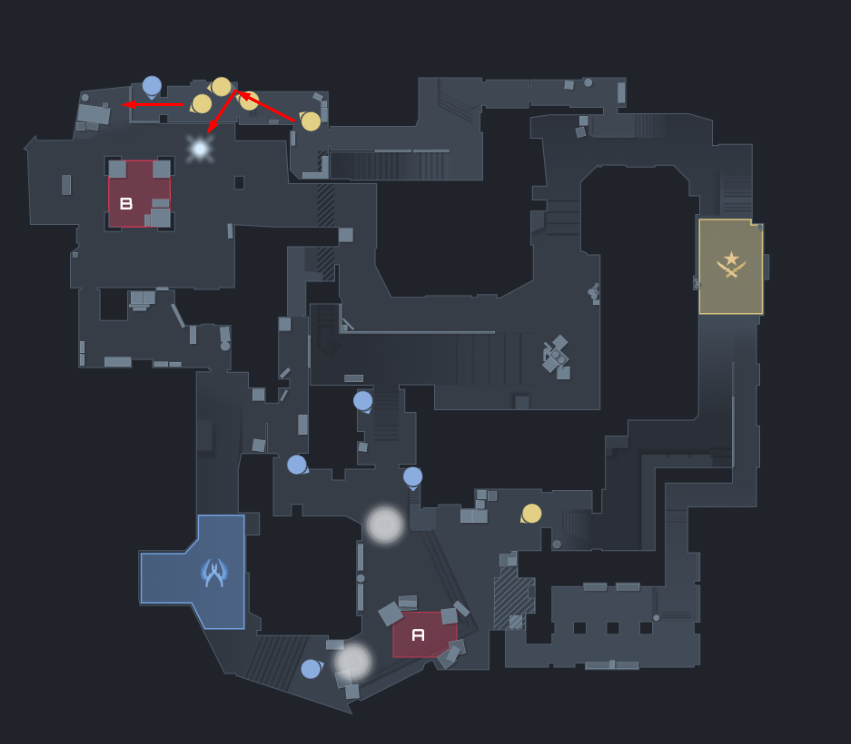
Step 1: A-site fake
When ready, player #1 throws a smoke grenade to jungle*. Player #2 throws smoke to CT-spawn in about 3 seconds. This timing will allow both smokes to land at the same time.
Then, player #2 throws 2 flashbangs to A-site through the top and runs out of the ramp. His task is to make some presence while trying not to die or at least to make a trade.
*All grenades were thrown are described at the end of the article

A-anchors will tell teammates that it seems like A-site execute. A minimum of one player should rotate from B-site to A. Thus, only 1 player should stay at B-site, who also might start a rotation, so he might be caught in a bad position.
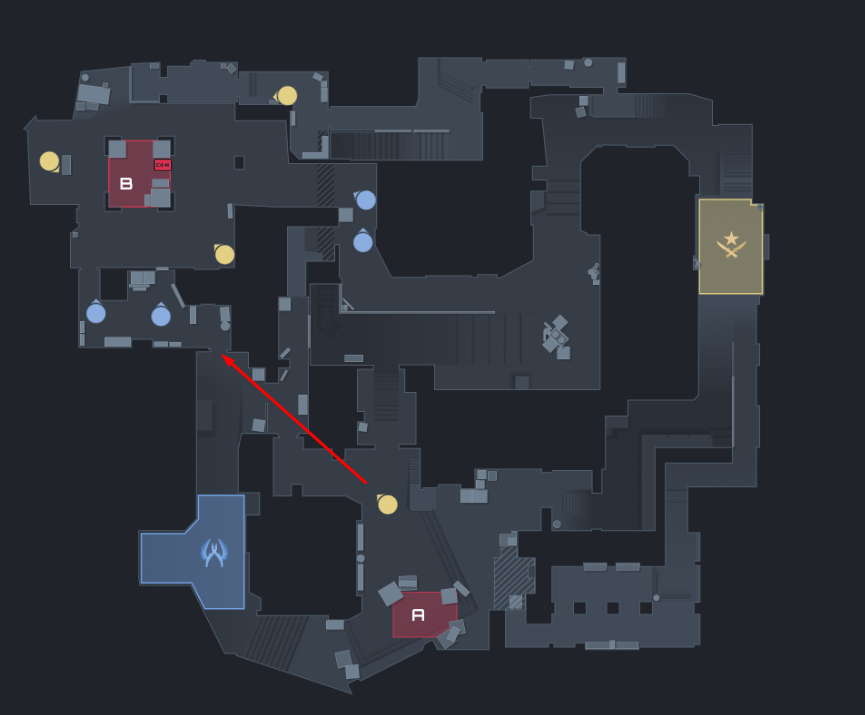
Step 2: B-site execute
Once heard rotation of B-site anchor, or just after a short period of waiting (5-10 seconds) after the fake execute, the core should start pushing B-site through apps. Player #1 throws pop-flash to B-site. The only player left on B should be only near car, or will be running through the site. The flash suits the second option, if we talk about the first one, Ts will just trade the anchor in the closed position.
After you have killed B-anchor, take the site and plant the bomb. The best option for you is the bomb planted for short – so then you can control bomb afterplant from multiple positions.
Step 3: Afterplant
Let’s say in B-apps you have traded 1v1, but the A-lurker stayed alive. With that said, we will have 4v4 situation, and CTs are going to make a retake.
Your big advantage is a deep lurker that can come behind CTs.
When he would realize that CTs started their rotation to B-site, he will have to carefully come behind through jungle. Even if the opponents care about the lurker, they will have to pay attention to him, that will make the retake harder.
Once spotted by the enemies, the lurker should delay the rotation to retake as long as possible.
What to do versus such strategy?
The strategy could be read by opponents in the following situations:
- Aggressive CT-play on pit and trading/killing the lurker. With that done, CTs will see that it’s only a lurker;
- Underpass and B-apps aggression – you are going to be revealed. If that happens, you should trade and instantly push B-site.
- Defensive mid or jungle player will track the trajectory of the falling smoke to jungle, then he might give the info about a possible fake.
Nades to throw
• Player #1, Smoke to jungle
We take the position of right corner near the TV-room's exit. Then, we aim A-site – on the right side we note triple-cross of antenna, and if we talk about lower part of the screen, the crosshair should be a bit left near the "A" letter.
Jumpthrow.
• Player #1, B-site from apps running flashbang
This flash should be thrown while you are running through B-apps. At the moment you have entered B-apps, you should aim a bit left than vertical ledge and just below the concrete ceiling. Several steps and then you should throw the flash with left button of the mouse. You can see the proper moment of flashbang explosion below.
• Player #2, default CT-smoke
Take the posision on the middle of the wall near T-spawn, jumpthrow.
• Player #2, A-site flashes
It's a running flashbang: try to hold the crosshair not lower than the point mentioned below. If you want deeper flashbangs, use jumpthrow.
GL, HF!


